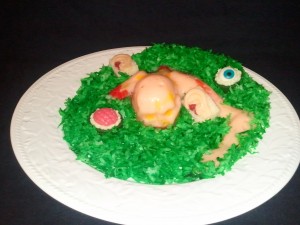
 Zombie Jell-O
It is around 7 PM, and after much shouting of names, you get zero response. It’s as if the entire household has literally disappeared. Yep, it must be that time again – family night!
Does your family dread the typical lesson plans and humdrum treats? If you are looking to spice up your family night list of scoobie snacks, read on!
Let me share with you a fabulous refreshment idea, including instructions to recreate. After all, it is about the food! Let’s face it folks, you know the motivation behind your kids pretending to listen for 30 minutes is the hope for some tasty treat. You may as well make it fun and worth the wait. I’ll be sure also to also include some possible topics to help you choose a corresponding lesson plan.
To begin, one could certainly argue Jell-O as being the top Mormon refreshment, especially considering the popular cultural stereotype that Latter Day Saints have quite an affinity for the gelatin-based substance. Fact or fiction, most Mormons consume a fair amount of this wiggly stuff.
Getting sick of the carrot slivers? Why not go all out and go Jell-O crazy. Okay, Jell-O shots may be going a bit too far, but what about a daring Zombie Jell-O mold? It’s easy to make, and oodles of fun to decorate. Your family will enjoy daring each other to eat it.
Crawling Zombie Mold
The below directions can be used for any Jell-O molds but I used the Crawling Zombie mold.
Ingredients
- 9 ounces Peach or Watermelon gelatin (to obtain a flesh-toned appearance)
- 6 ounces fat-free evaporated milk (has to be fat-free or it won’t work)
- Cooking spray
- Food coloring
- Water
Instructions
- Wash and dry the mold.
- Spray cooking spray onto inside of mold.
- Place gelatin into a large bowl and add 2 cups of boiling water. Stir until completely dissolved.
- Stir in ½ cup cold water.
- Add evaporated milk and stir for a couple of minutes.
- Add food-coloring if desired.
- Pour mixture into mold, leaving an inch from the top.
- Place a towel around the mold or place in a bowl to keep sturdy.
- Refrigerate overnight.
- Carefully shake mold to loosen and place mold onto a platter.
- Decorate with candies and food coloring as desired.
- Cover with food wrap and refrigerate until you are ready to serve.
- Dare your friends to take a bite. (It is edible, but good luck getting them to try)
Lesson Ideas
- The Resurrection
- May Zombie Awareness Month
- Surviving the upcoming Zombie Apocalypse
- Food Storage & Emergency Kits
- Survival Training
